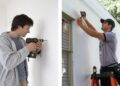
Embarking on the journey of DIY installation opens up a world of possibilities. From creating your own unique space to saving costs, the benefits are endless. Let's dive into the realm of DIY installation and explore the key aspects that make it a rewarding experience.
As we delve deeper, we'll uncover essential tools, meticulous planning, safety precautions, and finishing touches that elevate your DIY projects to new heights. Get ready to unleash your creativity and practical skills through the art of DIY installation.
DIY Installation Overview

DIY installation, or Do-It-Yourself installation, refers to the process of setting up or assembling something on your own without the need for professional help or services. It involves following instructions, using tools, and completing the task independently.
Choosing a DIY installation approach offers various benefits, such as cost savings, flexibility in scheduling, and a sense of accomplishment. It allows individuals to personalize the installation according to their preferences and learn new skills in the process.
Common Misconceptions about DIY Installations
- DIY installations are only for experts or professionals.
- DIY installations are time-consuming and complicated.
- DIY installations lack quality compared to professional services.
Tools and Materials Needed
When embarking on a DIY installation project, it is crucial to have the right tools and materials at hand to ensure a successful outcome. Here is a breakdown of the essential items you will need:
Tools
- Measuring Tape: An accurate measuring tape is essential for taking precise measurements before cutting or installing materials.
- Hammer: A hammer is necessary for driving nails and securing various components in place.
- Screwdriver Set: Having a set of different screwdrivers (flathead, Phillips, etc.) will help you handle various types of screws during installation.
- Level: A level is crucial for ensuring that your installations are straight and properly aligned.
- Utility Knife: A sharp utility knife will come in handy for cutting materials like carpet, vinyl, or wallpaper.
Materials
- Nails and Screws: Depending on the project, you will need an assortment of nails and screws for securing different components together.
- Adhesives: Different types of adhesives like glue, caulk, or double-sided tape may be required for bonding materials together.
- Paint and Brushes: If your installation involves painting, make sure to have the appropriate paint and brushes on hand.
- Flooring Materials: For flooring installations, materials like tiles, laminate, hardwood, or carpet will be needed based on your preference.
- Wall Coverings: If you are installing wallpaper or wall decals, make sure to have the necessary materials for the job.
Tip: Always choose high-quality tools and materials to ensure a durable and professional-looking finish for your DIY projects.
Pre-Installation Preparation
Proper planning is crucial before embarking on a DIY installation project. This phase sets the foundation for a successful outcome and helps avoid costly mistakes along the way. Here, we will discuss the essential steps to take during the pre-installation preparation.
Measuring and Assessing the Installation Area
Before starting the installation process, it's vital to accurately measure and assess the installation area. Here are some tips on how to do it effectively:
- Use a tape measure to determine the dimensions of the space where the installation will take place.
- Consider any obstacles or challenges that may affect the installation, such as uneven surfaces or tight corners.
- Double-check all measurements to ensure accuracy before proceeding with the installation.
Preparing the Space
Once you have measured and assessed the installation area, it's time to prepare the space for the upcoming project. Here are some helpful tips to get the space ready:
- Clear out any furniture or obstacles that may hinder the installation process.
- Clean the area thoroughly to remove dust, dirt, and debris that could affect the installation quality.
- Ensure proper ventilation and lighting in the space to make the installation process more convenient.
- Organize all the necessary tools and materials in a designated area for easy access during the installation.
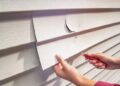
Step-by-Step Installation Guide

Now that you have gathered all the necessary tools and materials and prepared the area for installation, let's dive into the step-by-step guide for your DIY project.
Step 1: Measure and Mark
Start by measuring the area where you will be installing the shelf or laying tiles. Use a measuring tape to ensure accurate dimensions. Mark the points where the installation will take place using a pencil or chalk.
Step 2: Prepare the Surface
Clear the surface area of any debris or dust. If you are installing a shelf, ensure that the wall is clean and smooth. For laying tiles, make sure the floor is even and free of any obstacles.
Step 3: Install Brackets or Adhesive
Depending on your project, install brackets for the shelf or apply adhesive for the tiles. Follow the manufacturer's instructions carefully to ensure proper installation.
Step 4: Place Shelf or Tiles
Place the shelf on the brackets or lay the tiles in the adhesive, starting from the marked points. Use a level to ensure everything is straight and aligned correctly.
Step 5: Secure in Place
Once the shelf or tiles are in position, secure them in place. For shelves, tighten the screws on the brackets. For tiles, press them firmly into the adhesive and allow them to set as per the instructions.
Step 6: Finishing Touches
Clean up any excess adhesive or debris around the installed shelf or tiles. Step back and admire your handiwork, making any final adjustments as needed.
Safety Precautions

When embarking on a DIY installation project, it is crucial to prioritize safety precautions to prevent accidents and injuries. By identifying potential safety hazards and using personal protective equipment (PPE), you can ensure a safe and successful installation process.
Identifying Potential Safety Hazards
- Check for any electrical wiring or plumbing that may pose a risk during the installation process.
- Be mindful of heavy objects that may need to be lifted or moved, ensuring proper lifting techniques are used.
- Watch out for sharp tools or materials that could cause cuts or injuries if mishandled.
- Ensure the work area is well-lit and free of clutter to avoid tripping hazards.
Prioritizing Safety Measures
- Before starting the installation, familiarize yourself with the instructions and steps involved to minimize errors that could lead to accidents.
- Take breaks when needed to avoid fatigue and maintain focus throughout the installation process.
- Keep a first aid kit handy in case of minor injuries and know how to address common accidents like cuts or burns.
Importance of Using Personal Protective Equipment (PPE)
Wearing the appropriate personal protective equipment (PPE) is essential to safeguard yourself during the DIY installation. This includes items such as:
- Safety goggles to protect your eyes from dust, debris, or splinters.
- Gloves to shield your hands from sharp edges or rough materials.
- Ear protection if loud noises are present during the installation process.
- Appropriate footwear to prevent slips, trips, or falls on slippery surfaces.
Remember, safety should always come first when undertaking any DIY project to ensure a successful and injury-free installation experience.
Finishing Touches and Maintenance
After completing the installation process, it is crucial to focus on the finishing touches and maintenance to ensure the longevity and aesthetics of the project. Here are some essential steps to consider:
Final Touches
- Inspect the installed item or area for any visible gaps, uneven surfaces, or loose components. Make necessary adjustments to ensure a seamless finish.
- Apply a final coat of paint, varnish, or sealant to protect the surface and enhance its appearance. Choose a product that is suitable for the material used in the installation.
- Add decorative elements such as trim, molding, or accessories to elevate the overall look of the installation. These details can make a significant difference in the final outcome.
Maintenance Tips
- Regularly clean the installed item or area using mild soap and water to remove dust, dirt, or stains. Avoid using abrasive cleaners that can damage the surface.
- Inspect for any signs of wear and tear, such as chipped paint or loose fittings, and address them promptly to prevent further damage.
- Consider applying a protective coating or sealant periodically to maintain the finish and protect the surface from environmental factors like moisture or sunlight.
Enhancing Aesthetics
- Integrate lighting elements such as LED strips, spotlights, or decorative lamps to highlight key features of the installation and create a visually appealing ambiance.
- Accessorize the area with plants, artwork, or decorative items that complement the style and theme of the installation. This personal touch can add character and charm to the space.
- Experiment with different textures, colors, or patterns to create visual interest and depth in the design. Mix and match materials to create a unique and dynamic look.
Final Thoughts

In conclusion, DIY installation is not just about putting things together; it's about crafting a piece of your personality into your living space. By following the right steps and precautions, you can transform any area into a masterpiece. So, grab your tools, unleash your creativity, and let DIY installation be your gateway to a more personalized and fulfilling living environment.
Answers to Common Questions
What are the benefits of choosing a DIY installation approach?
Choosing a DIY installation approach allows you to customize your projects, save costs, and gain a sense of accomplishment.
How do I measure and assess the installation area accurately?
To measure accurately, use a tape measure and note down precise dimensions. Assess the area for any obstacles that may affect the installation.
What safety precautions should I take during DIY installations?
Prioritize safety by wearing protective gear like gloves and goggles. Avoid working alone, especially on complex projects.


